Ever since I got my 3D printer, I have been wondering whether it was possible to produce transparent parts. While there are plenty of transparent filaments sold on the market, they typically do not produce transparent prints, but rather translucent ones.
The difference between transparency and translucency is in the material’s tendency to diffuse light. Diffusion may result from several factors, the most dominant one in our case is the inhomogeneity of the print. Under normal settings, the printer leaves small cavities (bubbles) inside the print. Each cavity acts as a small lens (as it is curved) and scatters the light passing through, obscuring any image standing behind the print and making it… translucent!
Having in mind that the plastic itself is inherently transparent and that bubbles from the printing process are the only thing preventing us from achieving optically clear prints, I began searching for the right print setting to accomplish the task.
I started by searching the internet for prior attempts, but all I could find was this YouTube video. It was a great start, but I wanted to achieve clearer results.
Let’s Start
![]()
In short, the basic settings using CURA are:
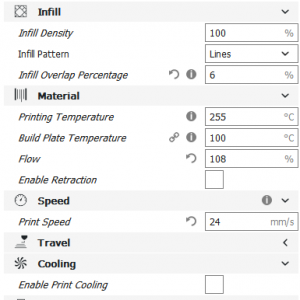
- Layer Height: 0.05 mm
- Infill Density: 100%
- Infill overlap percentage: 6%
- Flow: 108%
- Print Speed: 24 mm/s
- Enable Print Cooling: OFF
- Printing Temperature: 255 °C (on the highest end of the recommended range, I was using prusa’s ABS)
- Build Plate Temperature: 100 °C
- Nozzle Diameter: 0.4mm
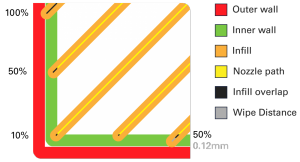
The main purpose of the setting above is to make the laid plastic’s consistency as thin as possible by heating it to the highest possible temperature, and then forcing it into the grooves of the previous layer by applying over-extrusion (flow > 100%).
(I found it especially difficult to eliminate bubbles at the interface between the infill and the outer wall. To deal with this I changed the infill overlap).
Before printing, make sure that the hotend is clean, as leftover material in the part can damage its purity. After the first layer has been laid down, the hotend must be as close to the build plate as possible, but not too close as it might get clogged or even scratch the build plate. To find the sweet spot, I found it best to adjust the “live Z” (on prusa MK3/2) to the point where the air gap between the tip of the hotend and the build plate just disappears. This rule of thumb ensures that the plastic is forced into any gaps between the first layer lines and the build plate.
Post-Processing
The down-side of over-extrusion can be seen in the video below, in which a “plano-convex spherical lens” (flat on one side, and curved on the other) is being printed. Notice that the hotend is scraping the last layer, and is pushing on a chunk of excess material resulting from over-extrusion. The chunk is more pronounced on the first layers and typically ends up on the surface of the model. Worry not, as it can be easily removed with a crafting knife.
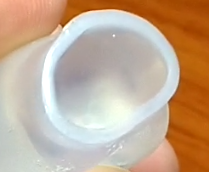
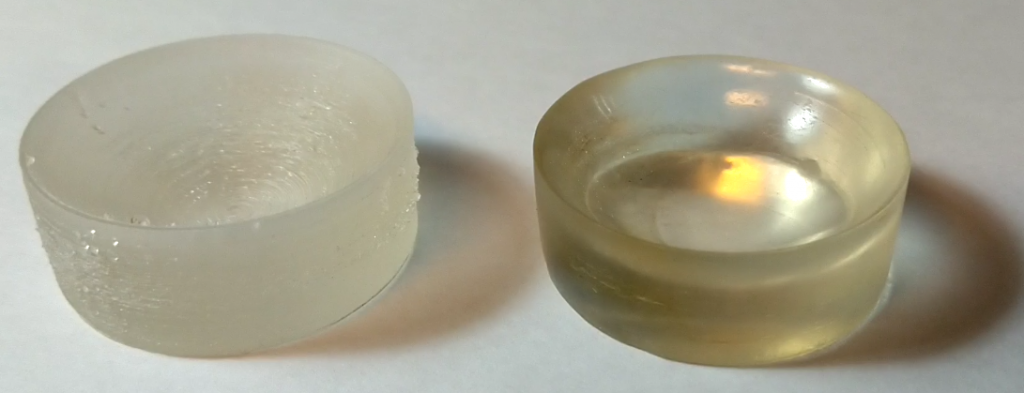
The next step is to turn the rough surface into a smooth one. In my first attempt I used acetone smoothing, and indeed, the surface got a lot smoother, but it also made the part look undesirably foggy.
Another technique I’ve tried and found successful was dry sanding using sandpapers raging from 600 grit to 4000, incrementally. It’s worth noting that cardboard can also be used instead of a high grit polishing paper.
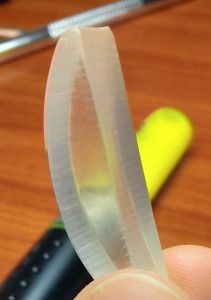
The reason why I’ve made all of my lenses flat-bottomed is that printing curved shapes would require hard-to-remove supports. Additionally, while sanding a flat surface can be done easily on a flat platform, such as a table, there is no easy way to smooth a curved surface, and hand-sanding it can distort its geometry.
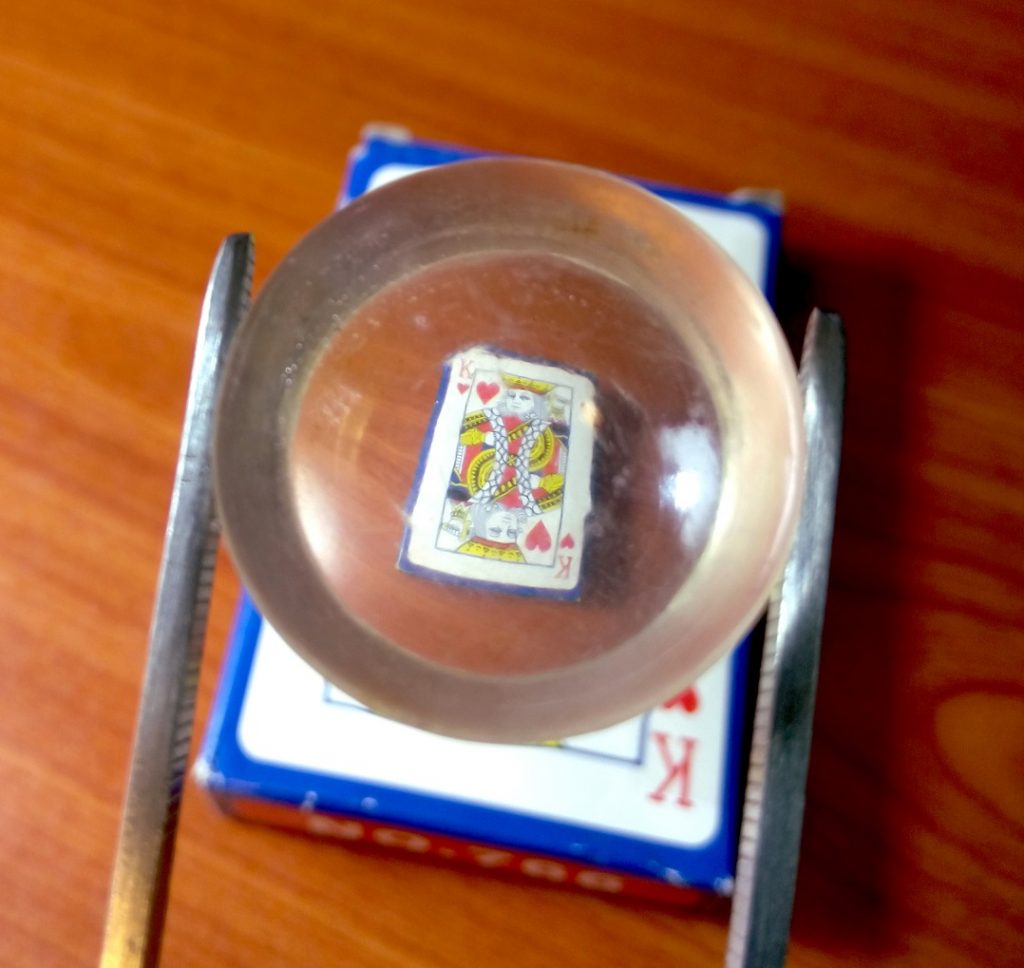
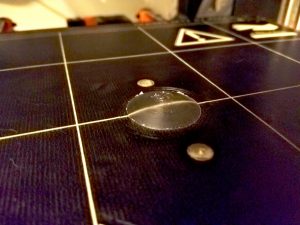
Although the quality of these lenses is not good enough for imaging (e.g. for the use of cameras), they’re certainly capable of focusing light!
So Let’s Have Some Fun!
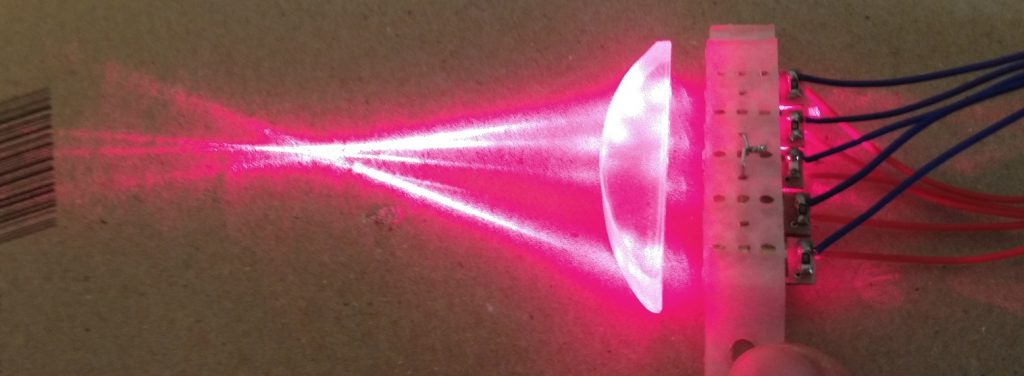
And nothing says fun more than LASERS! (pew pew pew) I’ve made a plano-convex cylindrical lens and a mount for holding the lasers parallel to each other. You can see how the laser beams are all focused into one spot. Success!

Another neat idea I had was to try and make something similar to those glass blocks that are laser-engraved with 3D figures. I downloaded a model of my favorite character – Mario. Using Blender I placed the model inside a cube and used the tool ‘Boolean’ to produce a cavity with the figure of Mario inside the cube. The result was not perfect, but I find it pleasing and unique.
One thing to note is that slicing softwares don’t like internal cavities. They see floating spaces as an error and try to correct them automatically. In order to “convince” the software to leave my shape alone I had to connect at least a small part of it to the outer shell. With the Mario figure, I simply moved it down so the shoes will touch the bottom part of the cube. I couldn’t find any option in Cura or Slic3r to disable error correction, and would love to find a way to allow internal cavities.
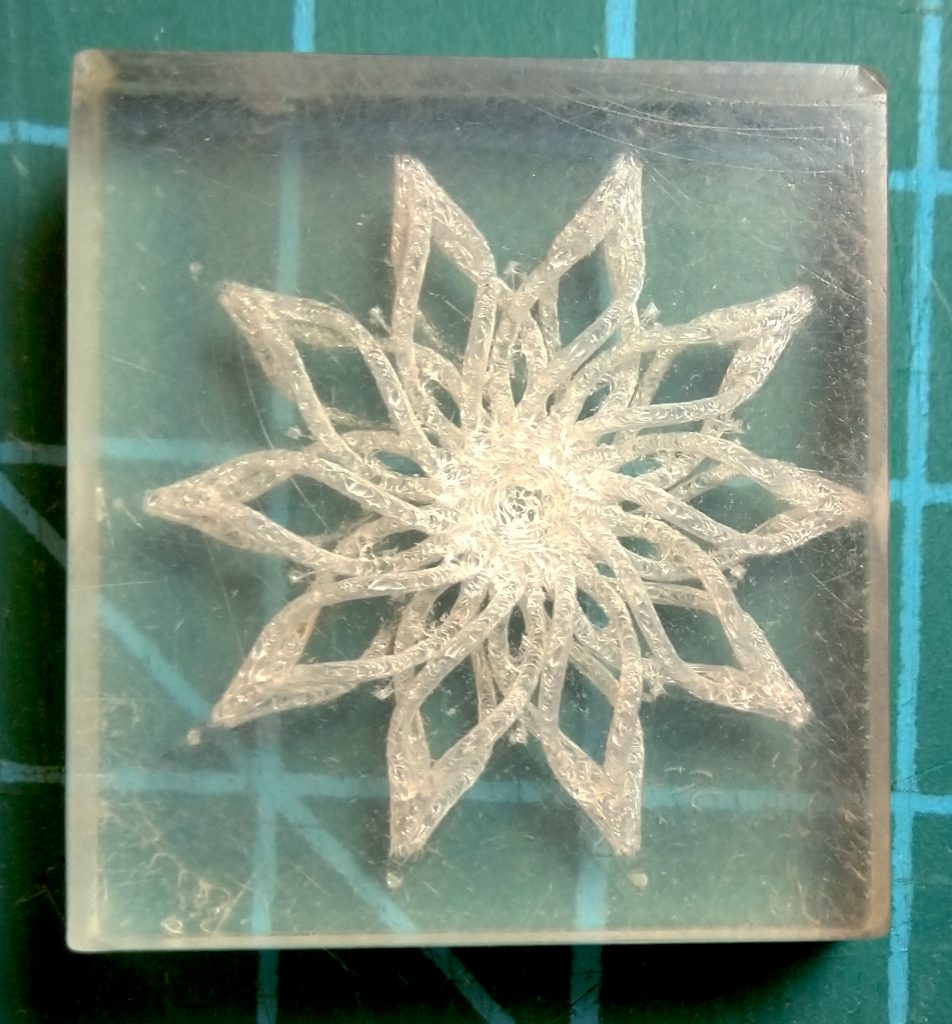
Looking for something more complex to make, I found this little thing and printed it using the process described above (this time I was a bit lazy with the polishing).
Below are some more examples: the prism on the right produces a small rainbow and the big lens can focus sunlight from one side of the room to the other. The bottom right print is just a simple round window that turned out almost perfect, because, as I mentioned before, flat surfaces are the easiest to sand.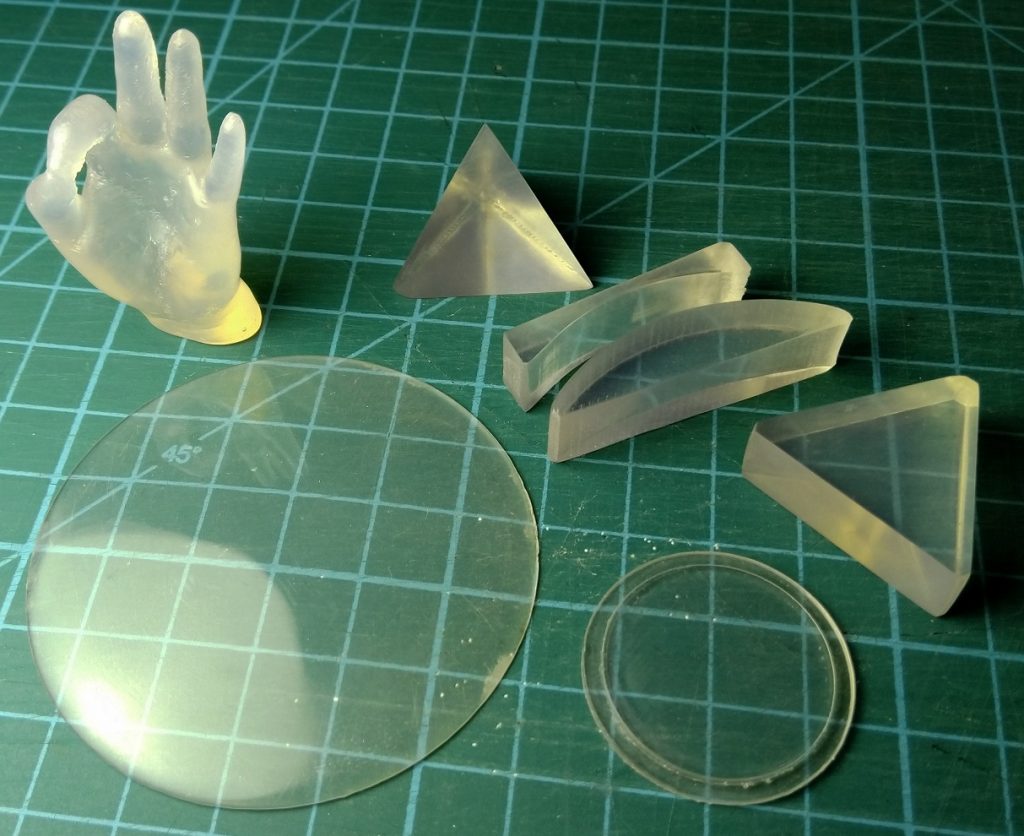
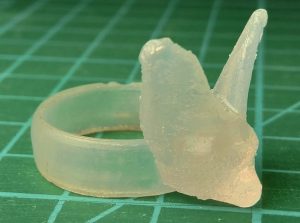
And last but not least: a Fennec fox ring
This is amazing, and thanks for the explanation and walkthrough. One question though, any special filament used? Brand? PLA? PETG?
hey man. he was using ABS sold on prusa. though I doubt that it is much different for different brands.
I’m going to try this with some of eSuns transparent PETG. This is awesome. Thanks for showcasing this.
Please share the results with us when you do!
Did you get anywhere?
Pingback: True Transparent Parts from a Desktop 3D Printer – MasMaz
Pingback: True Transparent Parts from a Desktop 3D Printer - itmix.cz | Informační Náskok
Pingback: True Transparent Parts from a Desktop 3D Printer
On the clouded one that you used acetone vapor, you might try dipping it in liquid floor wax. Model airplane builders do that to get crystal clear canopies.
Give it a try.
Time to make a telescope. At least it would be better than Galileo’s 🙂 It might even be really good at least to look through. The primary could even be a mirror if you applied a reflective surface. Then you could go big. Imagine a 100% 3D printed telescope. 🦊
p.s. I’m not sure if I’m talking to you, everyone, or myself. 🙂 All seem reasonable.
That sound awesome!! We are really looking forward to see new applications with transparent printing!
un dobson pourquoi pas
Awesome! Could it also work with PLA?
So you leave the print fan disabled the entire time?
Are the same results possible with PLA filament?
Yes, the fan was off the whole time.
I haven’t tried to use PLA but I believe that it’s possible. I heard that the results are better with ABS of PETG.
Pingback: True Transparent Parts from a Desktop 3D Printer - FeedBox
Pingback: 3D Printing Lenses And Other Transparent Objects With Your Filament Based Printer | Make:
You can get floating voids in Cura by just inverting the mesh normals of your interior mesh, then joining both the interior and exterior mesh together before exporting your STL.
Flipping your mesh normals in Blender is discussed on this thread (https://blender.stackexchange.com/questions/29132/how-do-i-flip-normals-on-this-model), and the function you’re looking for is spelled out a little ways down the page.
Hitting Ctrl+Shift+N when the mesh is selected and you’re in edit mode should do the trick for you.
Thank you for the advice! I will sure try it out.
Trying PLA. On a Prusa Mk3 with Slic3r PE.
110% flow (extrusion multiplier in Slic3r) seems best, so far. But the rectilinear pattern is still easily discernible.
Any tips?
Try using CURA, I had much more persistence infill lines rather then Slic3r.
Pingback: 3D Printing Lenses And Other Transparent Objects With Your Filament Based Printer | Down files
I’m thinking about printing a 45°-45°-90° prism.
Are there anything for me to concern about in terms of size of the prism? What minimum size do you suggest?
I would suggest to start with a small print, because the slow print speed it will take a long time.
Great stuff. Maybe a better way to make a lens would be to print the negative of the lens and then use an epoxy/polymer such as acrylic to make the optical component. Your method is obviously incredibly good at making detailed parts so this detail could be used to make an appropriate mold.
I have used Taulman PETT which I bake for 12 to 15 minutes at 220 degrees Fahrenheit on a clear glass plate. Lightly coat the plate with silicone if you don’t want to have the part stick to the glass. It will shrink slightly and sharp edges will round over but the resulting part will be very clear. This technique does not work with eSun PETG.
Thank you for the information. I will love to see your results.
Pingback: Transparent lenses from an FDM 3D printer - 3d print home
Excellent! Very nicely done, I hope to see more of this. It would be great to see this as a profile/template in slicers and more people can test it and maybe even improve.
I have never used it before but there is also a top surface ironing feature, could that maybe help with straightening out every layer? It would take more time but you could adjust the speed back from 24 mm/s to a much higher value.
Pingback: 3D printing lenses is now a thing and you can make them yourself - DIY Photography
Pingback: 3D printing lenses is now a thing and you can make them yourself – R Francoeur Photography
Pingback: Metoda druku 3D przejrzystych soczewek oraz innych elementów przy wykorzystaniu technologii FDM - 3D w praktyce
Pingback: Transparent lenses from an FDM 3D printer - Dubai News Gate
This is awesome! Well done.
How sensitive is this process to moisture in the filament?
I bet you could get a good polish on a curved surface by printing its match as well and placing an abrasive such as rouge or baking soda between them.
I’m definitely going to try this.
Pingback: Оптика на FDM 3D-принтере – как это делается | Allbreakingnews.ru
Have you tried printing a polisher for hard to polish surfaces? That’s the usual way of making lenses (in glass); a convex polisher for a concave surface and v.v.
Loose abrasives are used.
It would be fun do make a very fast aspheric lens. These require several polishers for different zones, because the curvature changes a lot from the center to the edge.
Another thing to make would be a faceted gem. If you can get some slightly fluorescent filament, a UV LED would make it glow.
Have you tried heat? I use a small butane torch to polish the edge of acrylic glass. It takes a light touch with the flame to get a very clear edge. With a bit of practice I got good results. I will make a few prints using your settings and try and see what I get.
Pingback: FFF方式3Dプリンタで透明部品を造る方法 | 3DP id.arts
Pingback: Fennec Labs stellt transparente Linsen mit Standard-FDM-3D-Drucker her
Pingback: Make: Japan | フィラメント式の3Dプリンターでレンズなどの透明なものがプリントできるか?
Quote: “One thing to note is that slicing softwares don’t like internal cavities. They see floating spaces as an error and try to correct them automatically. In order to “convince” the software to leave my shape alone I had to connect at least a small part of it to the outer shell. With the Mario figure, I simply moved it down so the shoes will touch the bottom part of the cube. I couldn’t find any option in Cura”
Have you tried the “Mold” mode under special modes? It creates a mold of the .stl, letting you define distance of mold wall to object wall width, roof height and mold angle.
Bonjour pourquoi utilise tu de l’abs ?normalement il faut utiliser un polycarbonate PC transparent pour un meilleur rendu de transparence .et une autre question est ce qu’en utilisant une buse de diamètre plus petite que 0.4mm le rendu serait meilleur ?
Pourquoi ne poses tu pas ta question en anglais, peut-être aurais tu une réponse, qui sait.
Pingback: 3D Printing Lenses And Other Transparent Objects With Your Filament Based Printer | 3D-Prints
Wow, this was usefull. Keep writing this kind of stories, you will get a lot of people to this post if you continue working on this.
Interesting…but that clear filament is sooooo yellow. Are you gonna try a more neutral transparent filament?
Do you use any kind of an optical CAD?
What’s up, this weekend is nice designed for me, since this time i am reading
this great educational piece of writing here at my house.
hi,
I have read your site. You have mentioned an excellent content in your site. Thank you for sharing. You may also visit: https://brentwoodprinting.com/
I have read some articles on your site that is very impressive and you have added a nice content.
thank you very much!
Awesome technique, I have been trying to get transparency before, but didn’t come close to this! I’ve had some pretty good results with your technique, using Refil recycled PET filament. But I cannot find the time to post process all the tests I’ve made 😀 I’m now looking for someone with a polishing drum to see if that saves on (some) sanding steps.
I did notice a slight error in the instructions as the infill overlap setting won’t have an effect in this case. As you put infill at 100%, it gets replaced by skin. So the skin overlap setting will take effect instead.
Skin pattern also seems to play a role, using concentric skin seems to sometimes get even better results.
Hi, thank you very much. I’m very eager to see your results.
Regarding the infill overlap,
are you sure about that? I see no mentioning about that setting to be relevant only to pattern infill in the website; https://ultimaker.com/en/resources/20416-infillOK, I found it in the source code, you are correct.
"value": "10 if infill_sparse_density < 95 and infill_pattern != 'concentric' else 0"Then, do we have to change something in the original post configuration?
Thanks for Sharing this wonderful blog with us. It is really helpful. https://atlasgroupme.com/
Your site is up to the mark keep it alive.
You may also check this: https://www.stocktradetowin.com/
Thanks for sharing this amazing information. https://twistyapps.com/
There is an option in cura to make a mold so that would have an internal cavity
Pingback: Transparent lenses from an FDM 3D printer – 3DFAST
Es gibt zwei Möglichkeiten, WhatsApp zu hacken: WhatsApp-Hack mit Zugriff auf das Telefon und WhatsApp-Hack ohne Zugriff auf das Telefon des Ziels oder Opfers. Um WhatsApp-Nachrichten mit Zugriff zu hacken, müssen Sie für kurze Zeit auf das Smartphone des Opfers zugreifen. Mehr dazu: https://mobilespion.de/hack/whatsapp/
Thanks for sharing this information for http://juniorgolfcamps.com/
We share the latest technology-related news and share the information about the events that are happened in the world, get all these on https://www.whateverison.com/
You have shared an amazing content on your blog, thanks for this. https://zrmsolutions.com/
Pingback: How to improve your 3D prints with annealing | 3D Printers Video Lab
Pingback: 3D printed lenses and other cool transparent objects | 3D-Prints
Pingback: 3D printed lenses and other cool transparent objects | 3D Printers Video Lab
Pingback: Véritables pièces transparentes d’une imprimante 3D de bureau – Lampe 3D
658484 4749Some truly good and valuable information on this web site, likewise I conceive the style holds superb capabilities. 903840
Thanks so much for this. My indicator cover fell off my mobility scooter while off roading! Im still very new to all things 3D, but needed to fix this asap. Lovely clear guide, off to load up some clear filament once Ive tweaked the design.
Hello, after reading this remarkable paragraph i am too happy to share my familiarity here
with friends.
What’s up, I want to subscribe for this weblog to take newest updates, so where can i
do it please help out.
Pingback: Imprimer une pièce transparente en 3D, c’est clair comme de l’eau de roche ! | Pyramide 3D
Hello colleagues, how is all, and what you would like to
say regarding this article, in my view its really
remarkable in support of me.
Pingback: Impression 3D de pièces transparentes à l'aide d'une imprimante FDM/FFF - FennecLabs - TUTO3D
Pingback: 3D Printing Transparent Parts Using FDM/FFF Printer - FennecLabs - TUTO3D
So given bubbles are the enemy, has anyone tried printing under vacuum with clarity as the goal?
how to minimize the infill print lines
Pingback: Cómo mejorar tus impresiones 3D con un recocido - Grilon3
Pingback: F168 – rakhoi.today
Pingback: F168 – tructiepkeonhacai.vip
Pingback: F168 – EnergyCasino2.com
Pingback: F168 – SocoLive61.com
Pingback: F168 – GameCasino.homes
Pingback: F168 – zjgfmd.com
1вин ставки [url=1win60925.help]1win60925.help[/url]
Dedicated to exploring how technology improves business, productivity, and everyday life.